Table of Contents
Kombucha Fashion

This project was initiated by Cameron Wilson, with further technical development by Peter Musk and creative development by Jimmy Eng. 2017
Summary
Kombucha is a fermented product grown on sweet black tea, which produces a vinegary, carbonated drink with purported health benefits, and also a floating skin composed of bacterial cellulose (called a pellicle). This project uses the pellicle, which is washed, dried and treated to produce a tough, flexible sheet that can be used as a raw material for making.
The process of fermenting the kombucha and creating the pellicle ready for use takes about three weeks. The method requires no sophisticated apparatus, can be undertaken at room temperature on an open benchtop, and produces a biodegradable fabric at minimal cost. As such, this is the first example of a program which develops participants' capacity to produce their own low-cost raw material, as well as giving them the skills and experience to make use of it.
Materials
Per litre of ferment:
- 6g of tea (or 6 teabags)
- 85g white cane sugar
- 1L of tap water
- 100ml of soured (fermented) kombucha tea
- coconut oil (optional)
- vaseline
Optional:
- PVC tape (electrical tape)
- 80 mm x 80 mm square of cotton
- a small (about 5cm square) cutting of fresh pellicle
- 1 cup of dry rice
- white vinegar
A printable version of the growing, harvesting and treatment instructions can be found here: caring_for_your_kombucha_-_word_doc_version_of_online_page.docx
Equipment
- 1.5 to 2L capacity shallow tub or tray with a lid. (The shallower the liquid the better the pellicle grows).
- Measuring jug, 500mL
- Stirring spoon
- Muslin bag (you can also use Chux or similar twisted and zip-tied to make a pouch)
- Kettle or urn
- Spray bottle
- Scissors
- Washing tub (no smaller than your growing container)
- Flat, smooth drying board – we use laminated table top/ kitchen cupboard melamine boards
- Paint Scraper
- Storage container
Optional:
- Washing up gloves
- something to cut a small breather hole into the lid of your container (~30mm diameter hole)
Growing Kombucha
- Wash your hands… properly- not just a social wash
- Thoroughly clean all utensils and receptacles using mild detergent and rinse. (You can use sodium metabisulphate solution for this - follow instructions on the pack, and be sure to rinse thoroughly before use)
- Boil water and measure 500mL into your tub or tray
- Add 85g sugar and stir until dissolved
- Measure out 6gm of tea and place in muslin (or other) bag
- Add muslin bag of tea (or 6 teabags) to hot water
- Wash your hands again
- Cover tray/ tub with lid
- Allow tea to steep until the brew cools to room temperature
- Yep… wash those hands again
- Remove muslin bag (or teabags) and add 400ml of cold water to the brew
- Add at least 100ml of the starter sample of fermented kombucha tea
- Replace the lid
- Keep your kombucha in a place where it won’t get disturbed and out of direct light
Optional:
- Cut a breather hole container lid, and cover with cloth square taped down around the edges with the PVC tape.
- Add a piece of fresh pellicle (40mm x 40mm) cut from the larger mass with clean scissors.
Caring for your Kombucha
Before doing anything with your brew, always wash your hands. All going well, an opaque, jelly-like white pellicle or skin of microbial cellulose should start to form on the surface of your tea within 3-7 days. This will continue to thicken over 2-3 weeks until it takes on the texture and appearance of fresh, cleaned calamari tube.
The key to caring for your kombucha is making sure it doesn’t get infected with common mould. The brew is most susceptible to infection in the first week as the tea sours. Once your tea has soured and the pH has dropped to between 4 and 4.5 it’s difficult for an infection to take hold in your brew.
If you do observe a mould infection (furry grey, grey green or even orange patches growing on top of the brew) you can combat this by spraying infected patches with a 1:1 mixture of white vinegar and water.
Harvesting, preparing and drying your pellicle
After two to three weeks a good Kombucha brew will grow a pellicle that is about 1cm thick. This is the point at which we harvest our pellicles. Sometimes you will have a slow brew that will take a little longer. You might want to wear your washing up gloves for this part.
- Without spilling any of your precious brew, remove the pellicle from the container and place it in another tub for washing.
- Wash your pellicle in a mild detergent and rinse in clean water. Repeat this cycle until the pellicle has lost its vinegary smell.
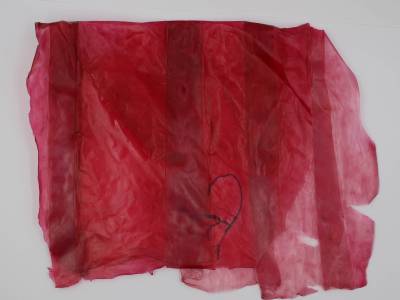
- Dyeing: Because the pellicle is composed of cellulose (the same as cotton), many fabric dyes will be effective in colouring your creation. Dyeing is best done after washing, and before oiling – just follow the instructions for the dye.
- Rubbing coconut oil into the pellicle at this stage (before it dries) will produce a more supple and leather-like product. For best results, spread the wet pellicle on a flat surface, and rub all over (both sides) with fingers dipped in coconut oil.
- Lightly grease your drying board (or a mould if you want to end up with a particular shape) with Vaseline to prevent the pellicle from sticking as it dries.
- Spread the pellicle over the greased board or shaped mould and allow it to dry for 4 -7 days.
- The 1cm thick pellicle will shrink to a 1-2mm thickness as the water evaporates. The length and breadth of the drying sheet will not change appreciably.
- When you are satisfied that your pellicle has dried completely carefully remove it from the board or mould. You can use a scraper to help you remove a smooth sheet, or simply start at a corner and gently pick away until it lifts up, so you can grab it between your fingers, and pull gently.
- If the dry product is too sticky give your next batch a more thorough wash. If it’s too papery for your purpose try washing the next batch less. Thinner pellicles will also tend to give a more brittle, papery product.
- Store your dry sheets of finished cellulose in an airtight container with a cup of dry rice to act as a desiccant. You can also put in an open container of bicarbonate of soda to absorb any lingering smells.
What about the leftover brew?
You have various options with the left over brew:
- Split the volume and use it to seed two new brews (maybe a friend would like one).
- Move the existing brew to a larger container and add more tea.
- Pour it away, though be careful about using it on plants - it is very acidic, and would need to be neutralized first (for example, by adding bicarbonate of soda until it stops fizzing)
Because the growing conditions described here cannot be guaranteed to give an uncontaminated product, it is not advisable to drink your brew.
Modifications
You can experiment with other food sources for the kombucha culture, too – keep the amount of sugar the same, and try coffee, or green tea as a nutrient source. Soluble plant fertilizers will also work (and produce a white pellicle), but contamination tends to be more likely.
Further work on using alternative nutrient sources was carried out by Luis Quijano, a visiting student from the USA. Luis demonstrated that it is possible to use starch from a variety of sources, enzymatically digested with apha-amylase (available from home brew suppliers) according to manufacturers instructions as an effective food source. Potato starch proved the most effective, but all types (tapioca, chick pea and lentil) were effective. None of the starch treatments produced as vigorous growth as the standard recipe using sucrose, but this seemed to be a result of insufficient concentration.
This work is a first step to developing a method for growing kombucha on starchy food waste (eg: stale bread) following enzymatic digestion.
A summary of Luis' results can be found in this document: kombucha_growth_experimentsjuly.docx
The effect of container size and liquid volume
It had been observed that the pellicle seemed to grow faster and thicker if the depth of nutrient medium was a minimum.
This was more systematically investigated by Luis Quijano (see document above) with results showing that shallow containers did indeed seem to produce relatively more pellicle in a set time. The same volume of growth medium was used in containers of different dimensions to avoid any effect of nutrient depletion (ie: all the tests had the same amount of medium, and therefore the same amount of available nutrients).
These results are in keeping with the known requirement of the bacteria for oxygen - bacterial growth happens at the surface, where oxygen is available from the air - and minimizing the depth means relatively more nutrients are available for growth. In deep containers, nutrients in the bottom layers feed the yeast, but not the bacteria making the pellicle.
Using Defined Growth Media
A scientific approach to growing the bacteria responsible for producing the cellulose pellicle was explored by QUT Honours student Charles Liddell in 2018. Charles began by isolating the organism from a sample of Kombucha provided from stock at The Edge, and used standard microbiological techniques of dilution plating to obtain clonal colonies of bacteria. Single colonies were selected, cultured and DNA tested. The organism resulting (Acetobacter xylinus) showed no great difference from existng isolates, indicating that several years of culturing with selection for pellicle production had not altered the wild genotype.
A defined growth medium was developed to grow the isolated bacteria, with additional nutrients provided to replace the contribution of the yeast present in 'wild' kombucha. Further experiments were undertaken to explore the adoption of domestic substitutes to maintain the democratic principles of this project, and it was found that 0.1% w/v Vegemite (a yeast extract) could replace the more expensive tryptone and yeast extract used by Charles. All these cultures showed a much higher rate of contamination that the usual method, indicating that further investigation of adding extra acetic acid (vinegar) to the starter medium as a way of reducing pH and limiting contamination would be useful.
Charles' defined medium recipe can be found in this document: defined_medium_for_kombucha.docx This recipe uses less sugar than that used as standard, which resulted in thinner pellicles.
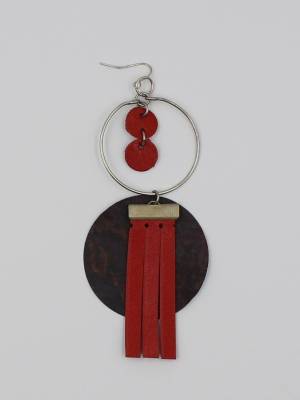
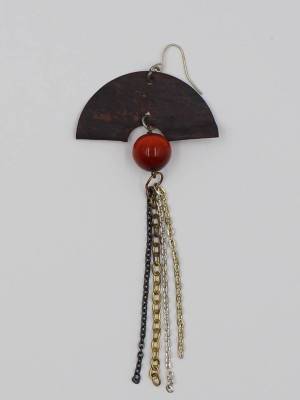
Making with Kombucha
Using the dried material
The properties of the dried material vary according to thickness, and pre-treatments.
Thinner wet material (<5mm) often appears semi-transparent, and dries to form a fragile, papery sheet.
Thicker material (5 -10mm) is more robust, but still tends to become brittle when dry, and more so over time. This has led to investigations into the effect of oiling the material, both to enhance water resistance, and to improve flexibility. Rubbing coconut oil into wet samples before drying improves both of these attributes. Linseed oil was tried on dry material, but did not penetrate effectively.
Very thick material (>15mm) dries very slowly, and has a dense, woody character.
In all cases, the dried material has been observed to darken over time, and this may be due to the tannins retained from the tea used in the growth medium.
Using the wet material
By draping wet material over a prepared mould, and then allowing it to dry in place, rigid and persistent 3D shapes can be formed in the product. Sheets of the wet pellicle also have the property of fusing to each other as they dry in contact. Strips of wet material can therefore be used to drape over moulds with sharp corners, or complex curves in a similar way to papier mache, with the final product a single coherent mass.
When wet material is dried onto a form, it will pick up very fine detail (lettering, surface texture) from the form. The texture is only visible on the part of the sheet in contact with the form, but raised lettering can be made if the letters are prominent enough.
The laminating of sheets of wet material can be used to incorporate other fabrics (cotton gauze, for strength, for example), other objects (pressed flowers or leaves) or possibly elements of wearable technology.
Wet material can also be blended to a pulp, and then used as a pourable casting medium to create solid 3D objects. Preliminary experiments have found that drying becomes very slow as the depth of the pulp increases, and shrinkage also becomes more of a factor to consider.
examples
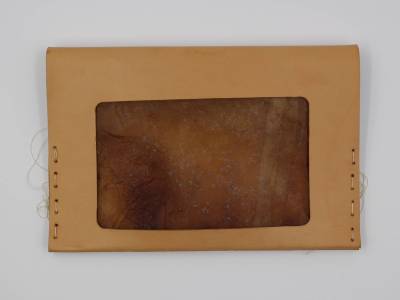
Punched, cut and pierced
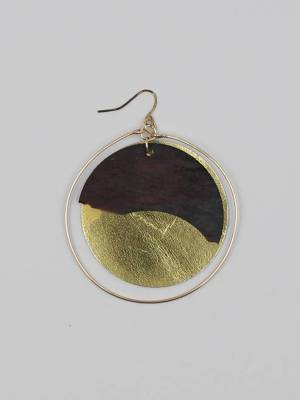
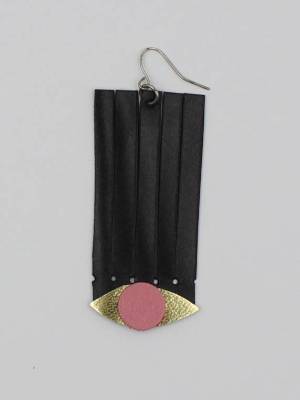

Painted
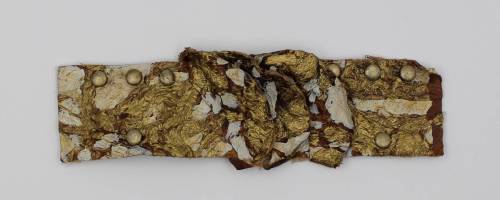
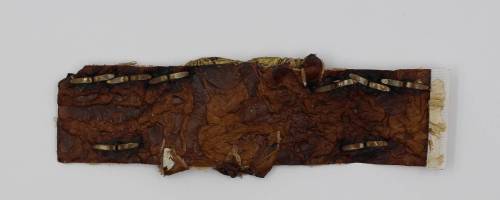
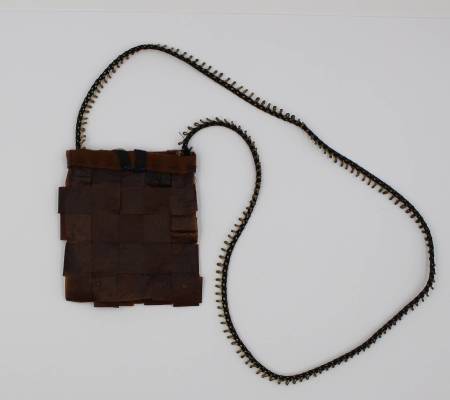
woven
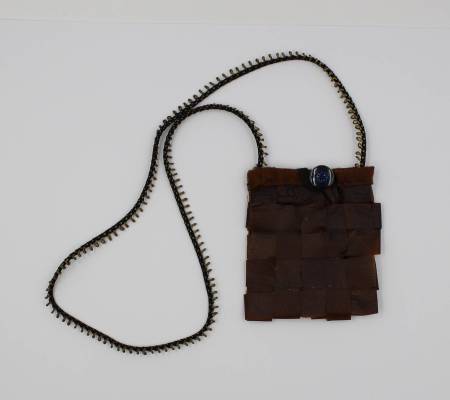
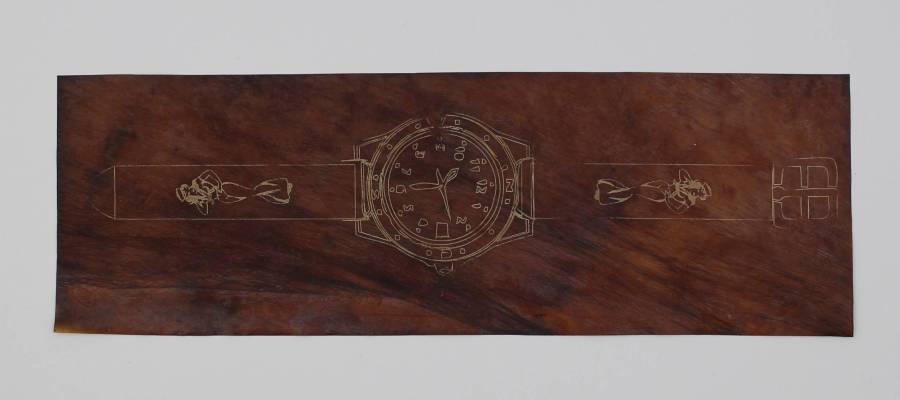
Laser etched
Stitched
Dyed