Table of Contents
Up Mini 2
- Working Area 120(W) x 120(H) x 120(D) mm
- Material: ABS
- File Input: SD card with gcode files, USB via Up Studio software
Operations
This page covers the use of the Up Mini 2 3D printers not covered in Up Mini 2 User Manual v0.1. For more information see:
Inserting the Perf board
More information about the different boards can be found in a section below.
Clean the board
Make sure the surface of the perf board has been properly scraped, the board should be free of protrusions. Small amounts of filament inside the holes should have little effect on the grip but should be removed for best result.
Insert the board
Insert the board as shown on the pictures. Support the print bed from underneath while sliding the board in or out with the thumbs.


Do not apply too much pressure to the bed itself as this may tamper with the calibration.
If more pressure is needed, compensate by applying equal pressure from underneath the bed.
Note the board only goes in one way as the cutout in the middle is not completely centered.
Adding new filament
To remove filament:
- Remove the two top panels from the printer case
- Retract the filament tube, exposing the filament
- In the Up Studio Maintenance tab, click 'withdraw'
- Keeping light upwards pressure on the filament, wait for the print head to heat
- Remove the filament when you feel it being pushed backwards by the feed gear
- Trim the end of the filament to an angle to allow easier reinsertion
- Wind the filament back around its spool, securing the end to prevent tangles
To install filament
- Feed filament down into the feed path as far as it will go
- In the Up Studio Maintenance tab, click 'extrude'
- Keep light downward pressure on the filament and wait for the feed gear to grab onto it
- Push the filament tube down into the feed path
- Replace the top case panels and check the back door is closed
UP Studio
Once the printer is connected to a laptop running UP Studio the printer's touch screen option will not be available. Almost everything can be done from UP Studio, so it's not really a problem.
Initialize

The first step that needs to be undertaken before printing is to initialize the printer. That can be done by pressing the initialize button on the left hand side menu. Most other options/button will be grayed out until this step has been completed. The initialization should only take a minute or so and you will be able to see the bed and the printer head move.
You will be able to see the name of the connected printer (e.g. “Up 3”), it's temperatures (Nozzle and Bed), which type of fillament is currently being used as well as an indication that it is ready to print.

Load Model

By pressing the + Button in the main menu you can add models, primitave 3D shapes or an image (which you can create a 3D model of). The model should show up in the 3D view area.
Maintenance

Before each print you should make sure that the filament is extruding properly. This can be done by going to the maintenance menu and clicking “Extrude”. If you want to make changes to the material or options, this can be done here too. Not recommended as you get prompted when it runs out.
Calibration
Automatic nozzle height can be set from the touch screen on the UP Mini (Calibrate → Auto) when not connected via USB. Manual Calibration allows more accurate calibration of the bed using 9 points across the printing board, and can be done in the software by selecting 'Manual' in the Calibration menu.
For a detailed description of how to calibrate Z height and bed level, please see Calibrating Z Height and Bed Levelling

Setting up the model
There are several setting on the Tools menu at the top right of the screen. Click each icon for more options. Hover over the icon with your mouse to get a tool-tip.

Printing
There are a handful of settings you need to check before printing.
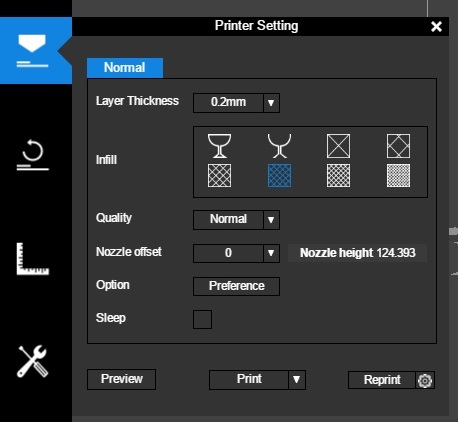
- Layer Thickness This option lets you determine how fine each layer is, essentially the thinner the layer the finer the print. This is an improvement from the original UP Minis (0.35mm), and it will have an impact on printing times.
- Infill Choose the density of the print's interior. This option determines how sturdy it will be and the structural integrity of the print. You now also have the option to just print an exterior without any infill.
- Quality Once again, a setting that determines the quality of your print at the cost of time. Lower quality generally results in a rougher print.
- Nozzle offset Tweak the height of the nozzle relative to the bed. This should almost never be needed, tweaks should be done in configuration menu.
- Option Clicking on Preferences gives you more options, covered below.
- Sleep Puts the printer to sleep after the print is done (Shouldn't be used as the print shouldn't be left unsupervised).
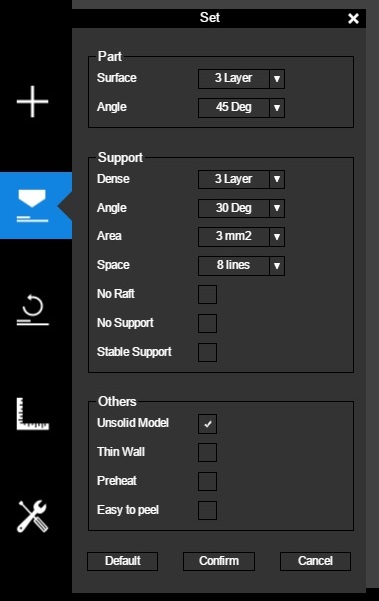
There are some advanced options in this menu that shouldn't be touched unless you know what you are doing. The ones that are more common to use are under the “Other” section:
- Unsolid Model Use this option for prints that have intersecting solids or when you are having trouble printing your model due to errors.
- Thin Wall Reduces the thickness of your model's outer wall
- Preheat Preheats the bed before printing (I believe this is done anyway)
- Easy to peel This option makes the model easier to remove from the board but will make it easier for the print to lift
Printer Boards
There are two types of boards that come with the UP Mini 2: M-PB-3 and M-PB-2.
M-PB-2 (UP Flex)

Some information from Jason at Tiertime.
The official name of the board is called UP Flex, which mean it can be flexed to make prints easier to remove. The UP Flex print board is not as durable as the perf boards, do not set the nozzle to close to the surface, otherwise prints will be difficult to remove. For mini2 the thickness of the UP Flex and Perf board are made to be the same, the you do not need to measure the nozzle again after changing print boards between these 2. (For UP BOX or UP BOX+, there is 0.4mm difference > between the 2 kind of print boards) You can use the board for many times if used with care, do not scrap the board with violence. Another tip for the UP Flex is, to print large ABS without any warpping, you can apply some ordinary glue stick on the surface, this will hold the ABS very well. You can even apply some cooling to the ABS when glue stick > is applied.
M-PB-3

This is the standard perf board which is recommended for use with the printer. It is durable and is easy to scrape.
TIPS
- Make sure UP Studio is running before connecting the Printer
- When loading your model into UP Studio and it shows up as red, it contains errors and may not print properly (or at all). Try fixing the problem by going to the Tool menu selecting More (4 horisontal lines) and selecting “Fix Errors”.